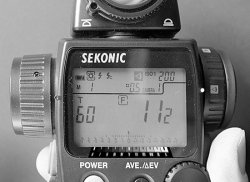
Spotmetering with Sekonic 758 (or others)

martin-f5

Popular Poster
Registered User
Joined
Sep 22, 2017
Messages
300
The most important tool I ever have bought was a Sekonic spotmeter.

Now I'm able to meter two or more points on the object I want to take on film.

I take, for example, my fomapan 100 with 100 ASA and set ISO on Sekonic to 100.
Than I measure on the brightest point I want to get nearly white and save that value. Second metering is on the darkest area I want to get, probably not the darkest one and also save that value.

Than I press the average button get the middle of both values and shot with this.
Tested this severals times and it really worked fine for me.
It even shows details in all areas I want to get on the sheet of film.
It also works if I use a filter, orange or yellow-green, hold this in front of the spotmeter and got perfect negatives.

I add bellow extension and black shield effect values too. There's a nice little tool on my cellphone, Inverso on android.

Is there something to make this better, except testing film and developing before all of this.

I'm short before using a old Sinar norma with 5x7 where negatives are € 84,-- for 25 sheets of film :) and I don't want to mistreat them.

Probably important to know I print in a traditional darkroom with beautiful materials like Agfa Brovira and so on.

Having heard you have to get all information on your negativ for creating the big sound of a print.
 
I have the same meter L758 and use it to mainly for placing zones and working out the development time based on the brightness range. I find fomapan can quickly build up contrast and needs to be controlled in development

With my fomapan 100, I usually rate it at 1/2 box speed (ISO 50) as I find it is a bit slower than what the box speed is

+1
 
Fomapan with Rodinal 1+50 dev. time 7:45 works fine at ISO 100. I probably have to make speediest for this for getting sure.
The question is how to move values in the light meter.
For ex. if I have a white reflection on a spoon an want to shift it down one stop.
Which can of course be done on the camera it self.
So I meter a value and want to shift it, is there a way on the meter?
 
I might have to look at this wonderful meter. Mine only takes single readings.

I'm not sure what "shift on the meter" means. You could begin again, altering the film speed setting, which would give you a different reading, but all your readings would be shifted at the same time. I don't quite see why you'd want to do this. It wouldn't alter the difference between the high and low readings.
It would be simpler to do it in your head.
The usual way to shift values is in development. Less development reduces the darkest parts of the neg, moving the highlights downward and extra development makes the highlights brighter. At the same time, all the other values move proportionally up or down.

I too rate Fomapan 100 at 50 and worry about its reciprocity.
 
I too rate Fomapan 100 at 50 and worry about its reciprocity

Based on my own testing, the enclosed chart is what I now what I use for the FomaPan 100 Reciprocity
 

Attachments

  • FomaPan100 Reciprocity.pdf
    11.9 KB · Views: 16
@martin-f5 , the L758 can do many dances depending on what song you want to play.

When using the meter for your workflow, are you metering for the shadows or highlights?

For me personally, I meter for the darkest textured area, lock that into memory. Then I press the AV button. Now, I keep the measure button pressed and scan the rest of the scene looking for the brightest value. The viewfinder will tell you the dynamic range of the scene.

I program the iSO 2 button for -1 because I like to place my shadows on Zone 4. I then expose at my first reading after pressing the ISO 2 button.

Example:
Between the darkest part and the brightest part, the meter tell me +8 which means the brightness range is 8 stops. I will then do an N-1 in development.
 
I've read the instructions for the Sekonic. Thank you. Very clever machine. I'd be inclined to make a little sticker, much the same as on my Pentax (0 I II III IV V VI VII VIII IX X) with grey patches behind the numbers, to make life a little easier.
 
I've read the instructions for the Sekonic. Thank you. Very clever machine. I'd be inclined to make a little sticker, much the same as on my Pentax (0 I II III IV V VI VII VIII IX X) with grey patches behind the numbers, to make life a little easier.

The Sekonic has a digital readout, where would you put the sticker
 
The Sekonic has a digital readout, where would you put the sticker
The problem that has vexed us all with this meter.

I have a scale on my Pentax Spotmeter, but as the scales move on the 758, the relation to Zones would move too.....making it worthless.

Mike
 
I was thinking of the numeric scale at the bottom of the screen, with zero in the middle. Z5 would be next to the zero, Z4 next to minus one, Z6 next to pus one and so on. There might be enough space on the bezel, but as you know, I haven't handled the meter. After taking the series of readings, and the first reading has been clicked downward, I'm guessing that it might be easier to judge where all of the values fall by relating them directly to Zones, rather than +/- digits. In practice things may be easier than I'm imagining.
 
@martin-f5 , the L758 can do many dances depending on what song you want to play.

When using the meter for your workflow, are you metering for the shadows or highlights?

For me personally, I meter for the darkest textured area, lock that into memory. Then I press the AV button. Now, I keep the measure button pressed and scan the rest of the scene looking for the brightest value. The viewfinder will tell you the dynamic range of the scene.

I program the iSO 2 button for -1 because I like to place my shadows on Zone 4. I then expose at my first reading after pressing the ISO 2 button.

Example:
Between the darkest part and the brightest part, the meter tell me +8 which means the brightness range is 8 stops. I will then do an N-1 in development.

First I measure and lock highlights, than shadows for getting Avg. Than I'm able to read all values of the subject with the measure button through the viewfinder, and that's really great.

Having done this I got really great negatives for the darkroom work.

I have to practise this more often / will do this next week :)
 
01.jpg

This is the sort of sticker I had in mind. Would there be enough space? The figures seem to have got a bit mangled in the translation from Illustrator.
 
I drew it up in Illustrator for the Pentax. This is cut and pasted in Photoshop. I don't know if the actual meter has enough space, but something similar might be devised. I like to take a reading and set it to the Zone I want, rather than doing constant small additions and subtractions as I meter. A bear of very small brain, I fear.
 
Here is a PDF of Zone scale in various sizes. I'm assuming that they can easily be scaled to size while printing.
 

Attachments

  • Zone scale two sizes A5.pdf
    63.1 KB · Views: 13
Back
Top