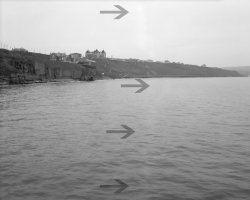
Any Thoughts On What Has Caused This

Ian-Barber

Admin
Registered User
Joined
Aug 6, 2016
Messages
1,586
I have noticed on two of the negatives I exposed on a recent day out to Whitby a bright line down the centre.
This one is the worse.

Film: FomaPan 200
Developer: Kodak XTOL Replenished (developed for 6.5 minutes)
3 minute pre-soak in water
Tank Processed in SP-445: 1 minute continuous agitation, 5 slow agitation every minute thereafter.
Water Stop Bath for 1 minute followed by 5 minute fix in Ilford Rapid Fixer for 5 minutes
5 minute final rinse followed by Kodak PhotoFlo​

My Thoughts:
Light leak from dark slide - light entering from the side?
Something gone wrong during development?​

Whats Your Thoughts:

Whitby-West-Cliffe-Fault.jpg
 
How fresh is the fixer, are you re-using it - if so what's the clearing time. I'm detecting slightly more than you've indicated on my ASUS tablet computer, a larger area in the sea mostly to the left of the darker streak (on the negative) and a little to the right.

It could also be development carrying on while filling with water, water doesn't stop development as quickly as an acid stop-bath.

Ian
 
How fresh is the fixer, are you re-using it - if so what's the clearing time.

The fixer is a few week old now, rather than waste some film to test clearing time, mixing a fresh batch should be cheaper

It could also be development carrying on while filling with water, water doesn't stop development as quickly as an acid stop-bath.

Very interesting thought. I stopped using Acid stop bath some time ago, whats your thoughts on using just water?
 
I use a couple of water rinses but it really depends on how quickly you can fill the developing tank and then good agitation. The film manufacturers state you can use a water rinse instead of stop-bath but it's really what works best for you.

Ian
 
Ian - is there a colour change when you look at the negative in oblique light? If there is, then it could be as Ian mentions, a change in density because of uneven fixing?

We all know an acid stop bath has two purposes, the first to stop development and the other is to protect the fixer from early exhaustion from carried over developer. That's why it has an indicator added.....it's more sacrificial than fixer.

My worry in using water rinses as a pre-fixer stage is that the emulsion will have absorbed some developer......adding water will just dilute it, whereas acid stop will kill the dev quickly.

IIRC, 1 litre of fix will be exhausted after 24 sheets of 10x8 film. I track the fixer usage so that i don't have to worry about recalculating fix times. When I reach this limit, i ditch the old fix.

Mike
 
Is there some small shiny surface inside the camera that this particular direction of light was able to catch. A black surface can be shiny.
A tiny bellows leak seems unlikely but it's worth checking. I don't see how it could be a dark-slide leak unless you have a crack in the sheath.
Did you pause while either filling or emptying?
Do you tilt the tank to fill?
Which direction do you rotate the tank and could you be doing it too slowly? What advantage is there in slow agitation?Do you invert completely?
Is the tank too full for sufficient movement of liquid?
I've seen no trouble with a water stop and all manufacturers seem to allow it. It does need reasonable agitation to remove residual developer.
Is the film touching something in the tank, even intermittently? Very unlikely with the SP-445's holders. Do you have the skeleton holders or the original solid ones? It's very unlikely that you have loaded the film with the emulsion facing inwards, everyone can be distracted...
Have you tried re-fixing in fresh solution? You might try dipping only one side of the neg in fresh fix to see if there was any difference between the two halves. Or extending the wash? Sometimes I find that dye still stains the wash water after several changes, but I've not discovered why. Perhaps it's the water temperature.
Finally, is the film faulty or has it been flexed accidentally? I remember that this can create marks, but I was using 35mm, which is much easier to buckle accidentally while wrestling with spirals.
Despite my familiarity with mistakes and unexplained problems, I can think of no more. Apologies if some of them seem too simplistic. Best of luck with your quest.
 
Ian, what version of the film holders do you have? I ask because I had the original (from Kickstarter campaign) solid style holders, then fairly recently bought the newest v3 holders with the cutouts. I was thinking that for certain processes that I run it might be helpful to have more chemical flow all around the film surface--front and back. However, I noticed some faint marks of slightly more density on the back of the film from the cutouts which would translate to lighter tone in a print.

Do you have any other way to process your film? Didn't you build tanks per Steve Sherman? If the issue continues, I would recommend shooting two sheets of film of the same subject, lighting, etc, then process one in the SP-445 and the other in something else. Compare.
 
Ian, what version of the film holders do you have? I ask because I had the original (from Kickstarter campaign) solid style holders, then fairly recently bought the newest v3 holders with the cutouts.
On this occasion, I was using v2 holders, I do have a set of the latest v3 here which I will try next time.

I would recommend shooting two sheets of film of the same subject, lighting, etc, then process one in the SP-445 and the other in something else. Compare.
I was going to try this today but as usual, its a very overcast day and I want a clear sky

Both Ian and David have mentioned some important points as well.

My fixer may be a little old now, which is one thing I can rectify.

There is also a chance I may have put to much water in the tank for the stop bath which as David suggested could have resulted in not enough room for the liquid to move around.

Ian raised a valid point as well which was how fast you can fill the tank. Normally, I have 500ml of water ready in a jug with a fast pour rate but on this occasion, I just poured it straight from the bottle which ahas a small neck and it was gulping a little as it was been poured in.
 
Ian, sounds like you have a solid plan for attacking this issue. I wouldn't dismiss an overcast day...middle gray clouds can reveal all kinds of anomalies! Regarding the pour rate, one of the tanks I use quite often for 5x4 developing is a B&W King stainless steel tank (very similar to the old 5x4 Nikkor tanks) that holds 1,050ml of solution. I use a water stop for all development and it takes approx 30 secs to fill the tank; I've never had any issue due to this amount of time.
 
Looking at everyones comments, I feel the weak link in this chain is the fixer and possibly the amount of water I poured into the SP-445.

These are the 2 areas I am going to change with immediate effect and then I will process a test sheet of the back garden and evaluate the results
 
Although fixer-testing kits are available, it might be worth sacrificing a sheet of unexposed film. Cut it into narrow strips (say ½ inch, giving ten strips) then dip one end into the fix and time how long it takes to become clear. The usual advice is to fix real films for twice that time. A slightly more refined way is to clear one end, then drop the whole strip in and time how long it takes to match the other end and no division is visible.
Fixer will go on working after its optimum usage has been passed. Film will be more tolerant of well-used fixer than fibre-based paper which can absorb unwelcome chemicals. Establishing a base-line time with freshly made-up solution might be helpful. I should test mine now; it's been a while...
 
Update:
=====

Mixing a fresh batch of fixer appears to have cured the problem, at least on 2 test exposures I made last night.

Why would a bad fixer have caused this, what was it doing?
 
Unfixed emulsion is opaque.
I once found I'd taken a picture with a very unusual halo lighting effect that I hadn't expected. For some reason, several years later, I had to re-fix it and the lighting effect vanished. A very small amount of unfixed residual silver had created the effect, not me. The neg looked fine to the eye.
I was very careless with the fixer then and I still am. Fix gets weaker and weaker as it's used and the necessary time extends. A few minutes more might perhaps have completed the process this time, but sooner or later you'd have run into the same problem.
We might also guess that the two ends of the negative got more agitation than the middle, but this is mere speculation. Something else may have caused the unevenness.
The Sherman holders might have masked the back and the solutions penetrated only partially from top and bottom. The sides would be masked by the raised edges. In that case, it would probably be undissolved anti-halation backing. We may never know, but you seem to have got to the root of the problem.
It seems from my experience that only a very small amount of unremoved material can cause this effect. You were unlucky in the adverse way it affected yours.
 
What I cant get head around is this...
if areas of the film was not fixed, why did it not go pure black as it would be sensitive to light when I removed it from the tank or are we assuming it was partially fixed
 
Ian, this is quite a perplexing issue to me because I've used and re-used film fixer for weeks without issue. I wouldn't say that I use it to exhaustion, but I don't mix fresh with every development. And, I've used standard F-24 style fix and ammonium thiosulfate fixer that I mix myself, and TF-4/TF-5. I've used the Formulary concentrate beyond their stated "don't use after storing one year" without issue. This all doesn't really mean a hill of beans to you...just relaying my own personal experience with fixer.

I agree with you that if the film wasn't fixed enough, it would tend to turn darker when exposed to light. The only other thing I can think of, though this is odd given what you've shown above, is a light leak somewhere. I would recommend sticking an empty holder into the back of your camera, take into a dark room, and do the "flashlight test" to determine if you have a leak anywhere. If that turns out okay, I'd expose a sheet of film in sunlight to a Zone V value, then spin the camera around slowly several times exposing all sides to the sunlight. Of course, this may not be possible in the UK. ;) Process the film and you'll know right away if you have a light leak. If you notice a bit of flare along the side of film where the darkslide is does, don't worry about that. You can (and should) throw your darkcloth over the rear standard any time when exposing in bright sunlight. This is so second nature to me that I do it all the time, regardless of the lighting conditions.
 
The developer can de-sensitise the film during the process of development. That's why you must do developing in closed tubes, but can open them in normal light to add the fix. In the Whitby case, the actual change in destiny was a good deal less than the variation within the waves. Had it been at a slightly different angle, it might have looked rather like a bright reflection on the water.
There will be other members on this forum who can tell you more about this.
The Garden picture is excellent.
 
The developer can de-sensitise the film during the process of development. That's why you must do developing in closed tubes, but can open them in normal light to add the fix.

The only developer I'm aware of that does this is pyro because it hardens (tans) the emulsion during development. I don't know about normal room light...Fred Newman recommends subdued light for BTZS tube developing when moving into the fix. Let's just say that I wouldn't expose MY film to normal room light until it has been in the fixer for, at least, twice the clearing time.
 
The other thing that can happen is the pH of the fixer changes when you don't use an acid stop bath, as throughput builds up this can change to neutral or even alkali causing dichroic fogging or some development to continue for a short time usually patchily

There are alkali fixers but it's recommended that you use an acid stop bath with them. Ron Mowrey (ex Kodak Research - PE on APUG/Photrio) devised some alkali fixers and has seen Dichroic fogging so recommends an acid stop-bath at half normal strength, so does Sandy King.

The film clip test is the quickest indicator of fixers behaviour, 5 minutes or longer clearing times are not uncommon with a used fixer bath. With 35mm it's easy you just use the leader, but you could cut a scrap piece of LF film into strips, I have silver estimation test papers which I use to check my own fixer.

Ian
 
The other thing that can happen is the pH of the fixer changes when you don't use an acid stop bath, as throughput builds up this can change to neutral or even alkali causing dichroic fogging or some development to continue for a short time usually patchily

Its making me wonder if using a stop bath even at 1/2 strength rather than plain water although adding cost, in the long run is more beneficial despite the number of people I read about that say they only use regular water.
 
Back
Top