Roses

Ian-Barber

Admin
Registered User
Joined
Aug 6, 2016
Messages
1,714
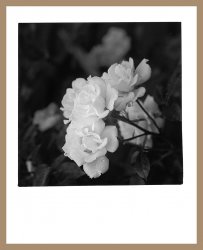
I made this photograph about 3 years ago when I bought my first MF camera which was a Mamiya 645 and this was the second frame I exposed on Kodak TRI-X. The print is on Ilford MG IV Pearl.

I still need to work on getting cleaner borders. Currently, I cut a mask out of black paper but its obvious that my cutting skills are not up to the "Blue Peter" standard for those that are old enough to remember "Blue Peter".
Roses-MG-Pearl.jpg

Roses-MG-Pearl.jpg
 
It's tricky to get the corners perfect. Another way is to take a brand-new scalpel blade and cut four strips, using a good straight edge, like an engineers steel rule and taking care to make a perfect cut. Then you assemble them into a rectangle. You can use quite thin black paper for the edges and them make a slightly larger window in something more sturdy to hold everything in place.
Alternatively, you could cut a window that was accurate in one direction and oversized in the other. Then you'd place two strips along the "wrong" edges to bring the opening back to size and give perfect corners.
It's important to use a brand new blade for anything critical. The part of the cutting edge that does the work when cutting card is very small and a blade might appear perfect when, for practical purposes, it's useless. You will need a decent square too, of course.
A further refinement would be to do the same thing, but with a thicker card frame (perhaps polyboard) and place it with the masking blades on top to give a soft edge to the print. This might suit some kinds of image.
I'm not sure how Blue Peter would have made this out of egg-boxes, sticky-back plastic and washing-up liquid bottles. As I recall, anything tricky was introduced with "Here's one I made earlier."
 
How about using a mat cutter to get a clean aperture? The Logan Mat cutters can make a 45° cut, so you get less chance of the top of the card getting in the way.
 
A straight edge is more precise. The top edge won't get in the way due to the angle the light's fallin at from an enlarger.

Use a good sharp Stanley knife to do the cut out then blacken the edges with an indelible marker av few times, works perfectly. I made one when printing 24"x20" prints and it lasted over a decade.

Ian
 
The biggest part of cutting an accurate rectangle out of a sheet of card is marking it out accurately in the first place. Not so easy if you only have a ruler, straight-edge and perhaps a carpenter's square.
The first essential step is to ensure that two adjacent edges of the card are actually square, i.e. at 90 degrees to each other. Then make all your measurements from these edges.
Once everything is marked out, use a Swann Morton scalpel with no.10A blade. Much better than a Stanley Knife. For the inner window start the cut at one corner but don't take it quite as far as the next, in case you overcut. Stop short then turn everything round and cut back from the second corner as far as the end of the cut.

If you have difficulty marking out an accurate rectangle, then using a mount cutter will be a better way of doing the job. The mount cutter has a fence/guide which ensures accurate 90 degree corners if the card is correctly positioned. But this will only work if the card has 90 degree corners to start with.
You can, of course, use the mount cutter just for marking out, and do the actual cutting with a straight-edge and scalpel.

Alan
 
Back
Top