John Nelson
Registered User
- Joined
- Nov 5, 2026
- Messages
- 5
Hello, I’m John and I’m building an 8 X 10, 120 mm pinhole camera. With the structural box assembled and the glue dried, this week I moved forward to applying the veneer to the outside of the box. The veneer serves two purposes: it will be an attractive and interesting protective outer surface, and it will cover the outer mortise & tenon corner joints and adding a layer of light-proofing.
I approached this job with zero experience, but with all the bravado of a seasoned YouTube watcher and AI web searcher. I imbibed a number of conflicting narratives, but when distilled, they pointed me toward using a clothes iron to apply the veneer using PVA glue. PVA glue is known as carpenter’s glue, usually white or yellow. There are several variants, and using heat to adhere surfaces together seems like an off label use. The idea is to spread a layer of glue on both the camera body and the back of the veneer sheet, let the glue dry for about 30 minutes, then position the veneer on the plywood box. The glue is dry so it doesn’t bond the way contact cement does. Then, using a domestic clothes iron set at “cotton”, iron the veneer from the centre outward. The heat melts the glue and it fuses the glue layers together.
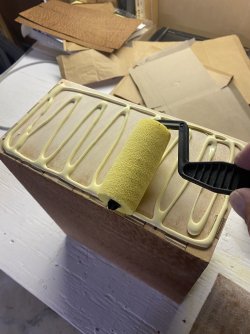
I tried gluing a scrap of veneer to a test piece of wood and the result was impressively strong, smooth, and flat. Thus emboldened, I applied smooth layers of glue to the camera front and to its piece of veneer and waited until the glue was dry to the touch. With the veneer positioned, I covered it with a sheet of brown bag paper and ironed away. It only took a few seconds for the thin sheet to bond to the plywood box. I can tell you I had been quite apprehensive about this step, and I was very relieved when it worked! One thing I noticed was that there were a couple of short spots near the edge where I hadn’t applied quite enough glue, but it was quick work to squish some glue in the void and clamp it until it dried. For the remaining pieces, I put a bit extra around the edges after rolling the glue on with a little foam roller. I found that the layer of brown paper was unnecessary and there was no damage to the veneer from the hot iron.
With the oversized piece of veneer secured, I used a sharp utility knife to trim it to size against the box edges, then sanded the thin edges straight and smooth.
Why not use contact cement? I work in the furnace room in my basement, so volatile chemicals are not an option because there is often an open flame in the forced air furnace or the hot water tank. And contact cement would stink up the whole house. The same considerations will apply for the finishing phase, but that won’t start for a few days until I test some alternatives.
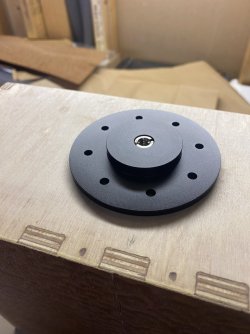
The other news is that the tripod mounting flange from Amazon finally arrived. That was one piece I fretted about a few weeks ago, thinking that I would need to learn CAD drawing skills and send a drawing out to the CNC service to be custom machined. But with a bit of creative searching, I found just the thing for only $19 CDN.
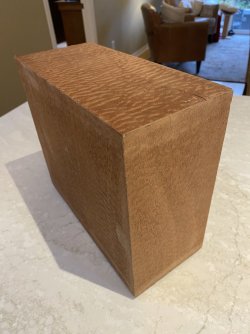
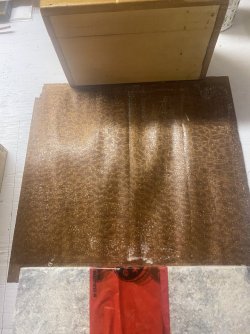
Thank you for reading this far. Here is a picture of the tripod flange, the raw veneered camera box (unsanded, unfinished) and two photos of the glue up process.
I approached this job with zero experience, but with all the bravado of a seasoned YouTube watcher and AI web searcher. I imbibed a number of conflicting narratives, but when distilled, they pointed me toward using a clothes iron to apply the veneer using PVA glue. PVA glue is known as carpenter’s glue, usually white or yellow. There are several variants, and using heat to adhere surfaces together seems like an off label use. The idea is to spread a layer of glue on both the camera body and the back of the veneer sheet, let the glue dry for about 30 minutes, then position the veneer on the plywood box. The glue is dry so it doesn’t bond the way contact cement does. Then, using a domestic clothes iron set at “cotton”, iron the veneer from the centre outward. The heat melts the glue and it fuses the glue layers together.
I tried gluing a scrap of veneer to a test piece of wood and the result was impressively strong, smooth, and flat. Thus emboldened, I applied smooth layers of glue to the camera front and to its piece of veneer and waited until the glue was dry to the touch. With the veneer positioned, I covered it with a sheet of brown bag paper and ironed away. It only took a few seconds for the thin sheet to bond to the plywood box. I can tell you I had been quite apprehensive about this step, and I was very relieved when it worked! One thing I noticed was that there were a couple of short spots near the edge where I hadn’t applied quite enough glue, but it was quick work to squish some glue in the void and clamp it until it dried. For the remaining pieces, I put a bit extra around the edges after rolling the glue on with a little foam roller. I found that the layer of brown paper was unnecessary and there was no damage to the veneer from the hot iron.
With the oversized piece of veneer secured, I used a sharp utility knife to trim it to size against the box edges, then sanded the thin edges straight and smooth.
Why not use contact cement? I work in the furnace room in my basement, so volatile chemicals are not an option because there is often an open flame in the forced air furnace or the hot water tank. And contact cement would stink up the whole house. The same considerations will apply for the finishing phase, but that won’t start for a few days until I test some alternatives.
The other news is that the tripod mounting flange from Amazon finally arrived. That was one piece I fretted about a few weeks ago, thinking that I would need to learn CAD drawing skills and send a drawing out to the CNC service to be custom machined. But with a bit of creative searching, I found just the thing for only $19 CDN.
Thank you for reading this far. Here is a picture of the tripod flange, the raw veneered camera box (unsanded, unfinished) and two photos of the glue up process.